How computers start up! Part 1: BIOS in X-86
Deep dive into the process of finding boot-able media in x-86 processor machines which use BIOS as their firmware.
Your motherboard is hardwired to receive the boot signal from the power button or the power on packet from network (WakeOnLan) and starts executing the instructions placed inside the non-volatile random access memory(NVRAM). These instructions are collectively called your firmware, BIOS in this case, which is also known as the program stored in your ROM. It is not true that this memory storage is only read-only, there are parts in this memory that are writable. BIOS settings are stored in CMOS chip inside the motherboard and is kept on all the time using a battery which also keeps the clock running even when the system is off.
So, what commonly known as BIOS is actually just a piece of software residing in ROM which kicks in when the power is turned on. It has a few responsibilities,
- POST : Power on self-test, it is a hardware verification process to assert if all the connected devices are working as they should be.
- BIOS : Drivers which interfaces between the operating system and your hardware.
- Bootstrap Loader : Find and load an operating system and let the control be transferred to it.
- CMOS Setup : Configuration program to allow users to setup time, date, passwords and other variables if the system requires.
As interesting as all those responsibilities sound, our focus in this article is going to be the process of switching to a boot-able operating system(Linux in our case, but very well can be windows as this process is same for both).
Finding Bootable Devices
Storage devices like hard-disk drives and flash drives contain partitions. These partitions may contain an OS, which is referred to as a bootable partition. In the case when BIOS is used, instead of more recent solution UEFI, all the storage devices are to adhere to Master Boot Record style partitioning.
Master Boot Record(MBR)
Let's talk units first.
1 Sector = 512 Bytes
The first sector of any storage device contains a MBR
MBR contains three important pieces of information,
- Bootloader (446 Bytes)
- Partition Table (64 Bytes) [OPTIONAL]
- Boot Magic Number (2 Bytes)
Boot Magic Number (2 Bytes)
This last piece of information, Boot Magic Number, is first looked for by BIOS in every connected storage media, may it be a HDD, SDD or simply a flash drive. It dictates whether or not this media contains a bootable partition, like Windows, or not. If the corresponding bytes contain the Magic Number 0xAA55, one of the partitions is bootable. But which one? Well, BIOS does not care, it will simply go at the start of the sector, where boot-loader resides and starts executing instructions. It is the job of the boot-loader to carry on the boot process from there on.
Partition Table (64 Bytes)
Information about the partitions, starting and ending addresses in terms of sector numbers, are stored in the form of a list is also stored inside the MBR. Do not mess with this region as corruptions in this region of the media will render the storage useless, one without partitions and will be promted to be formatted.
MBR can only contain information about 4 such partitions and each partition can only range from 0 to 2TB because 32 bits are reserved for partition size section.
BIOS does not have to deal with these partitions itself. It simply checks for the magic number and outsources the task of booting up a particular partition to another program known as the Bootloader!
Boot-Loader(446 Bytes)
This is the first 446 Bytes of the first 512 Bytes of the HDD. Bootloader is a piece of code written in assembly, responsible for,
- Finding a kernel
- Placing it in memory(RAM)
- Jump to its first location and start executing.
It is the responsibility of the programmer to write absolutely flawless bootloader because in case of a single error the system sleeps. At this early stage there is no parenting programs available to monitor the health of the system, one mistake can take it all down!
The Boot Loader
Let me just show you the simplest form of a bootloader in all it's glory, in assembly .
; A simple boot sector program that loops forever
; 510 Bytes Bootloader without partition table
loop:
    jmp loop

times 510-($-$$) db 0

;2 Bytes Magic Boot Number at the end!
dw 0xaa55
The above boot-loader does nothing useful, it just keeps on looping infinitely, but the fact that the Magic Number exists at the end makes the BIOS think that the boot-loader exists and it starts the executing from the start of the sector.
First sector is also known as the Boot Sector. If you omit partition table then you have 510 Bytes of space just for the boot-loader code, sometimes that is not enough. In the case the loader exceeds 510 Bytes altogether then the extended code is kept somewhere in the storage media and the job of this first stage loader is to invoke the Second Stage Boot Loader. There can be even a third stage if you like or even more, but sane people generally stop at 2 or 3.
;A bootloader that prints hello and then loops
mov ah, 0x0e ; tty mode
mov al, 'H'
int 0x10
mov al, 'e'
int 0x10
mov al, 'l'
int 0x10
int 0x10 ; 'l' is still on al, remember?
mov al, 'o'
int 0x10

jmp $ ; jump to current address = infinite loop

; padding and magic number
times 510 - ($-$$) db 0
dw 0xaa55
To use this we will initiate a QEMU machine and provide the compiled version of this code as the storage device.
Compile on Linux: nasm -fbin boot_sect_hello.asm -o boot_sect_hello.bin
and run this in QEMU(virtual machine)
Execute: qemu boot_sect_hello.bin
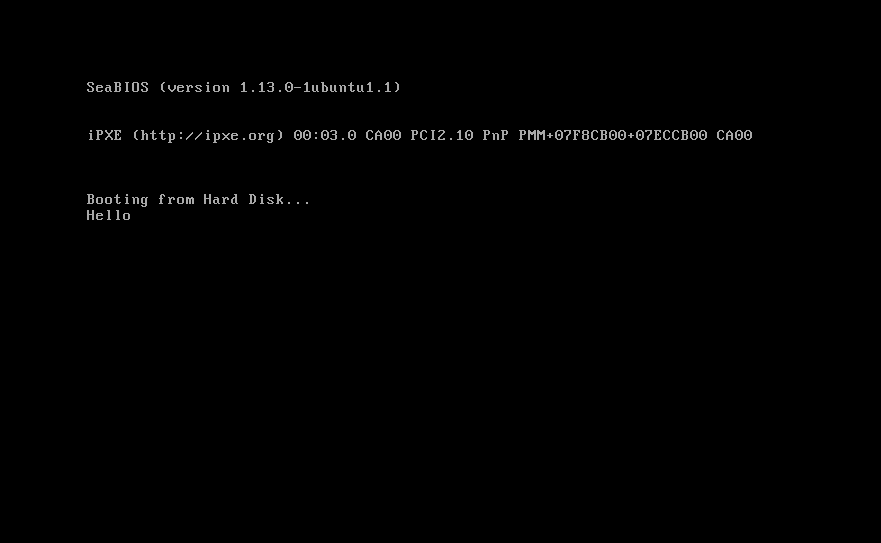
Job well done for the BIOS at this point as it's role has finished. Now it is up to the boot-loader to find the appropriate kernel and load it into the memory!
Normally, an assembly language code is used before the kernel is involved. At this point CPU is working in 16-bit( Real mode) even though hardware allows for 64-bit. A normal C program cannot yet get executed because the environment is too low level. There is no memory management, like paging or segmentation, available. We shall step into the 32-bit mode(Protected Mode) with the introduction of segmentation.
This article is to be continued in the next issue, Part 2: Real Mode(16-bit) in X-86 assembly
Visit OS Dev for detailed information about the topic discussed above.