Building a Virtual Quantum Computer...in python
Code the simplest Quantum Computer in python from scratch and implement algorithms like quantum teleportation!

Going to build the worlds simplest quantum computer simulator in python from scratch using nothing but the numpy module for the core matrix computations.
In case when you are new to quantum, please check out my previous post on theory of quantum mechanics. You can also refer to the last section for some good resources.
Source code for this article is available in my github!
A bunch of disclaimers first
- I assume that the reader is a little familiar with the theory of Quantum Mechanics, state, operators, entanglement and superposition and its representations in mathematics.
- I assume that the reader is, again, a little familiar with the mathematics of matrices and tensors( only tensor/ Kronecker product is required for today)
- We are not going to define the concepts used in this article using formal language of mathematics, only when it is pertinent for the article.
- The qubits imparts both spatial and temporal complexity in the exponential of its cardinality. So the number of qubits you will be able to use will highly depend on your classical hardware as the need for resources grows exponentially.
- I can( or definitely will ) make mistakes, you can connect to me over my email: iamn71@neoned71.com to have them corrected, or just to chat.
- This article is one of the longer ones, hang tight and grab a cup of coffee!
What is a Quantum Computer?
A classical computer(regular computers) manipulates the real world physical objects, like flip flops in memory devices, or voltages inside a circuit in order to compute something. A quantum computer plays with the quantum properties of a quantum system, for example spin of an electron, to make use of superposition, entanglement and the collapse of the wave function in order to perform some tasks better than a classical computer.
It is not the speed that is astonishing, quantum computers can be slower than classical computers in terms of the ability to execute more instructions per second, but the conceptual leap, is that, a single instruction is doing more than the one in a classical computer.
As you would already know that the problem of factoring can be solved(Shor's algorithm) using a quantum computer, but it is still unsolvable using a classical one.
The Overview
We will start by defining the state of a single qubit using its spin in Y direction, or in |UP> and |DOWN> bases. We will define some single qubit operations, also known as quantum gates, which will result in superposition. We will also define measurement here.
You will see that these operators are nothing but some fixed size matrices, different sizes for different number of qubits it operates on. Then we will move on to a 2-qubit-system and 3-qubit-system to see how to entangle qubits with each other in order to perform more complicated calculations.
Then, by this time, readers will have had a good understanding of how all this works, so, we shall generalize the whole system to support arbitrary number of qubits.
In a classical computer, the smallest unit of information is a bit. In the quantum setting, we have a qubit. A bit can be either a 0 or a 1, but a qubit can be both 0 and 1 at the same time, or it can be 70% a 0 and 30% a 1, or in any arbitrary combination.
The Setup
You should install the following packages to carry on,
- Python 3.6
- python library:
numpy
Finite Qubit System
Single Qubit system
Let me formally define the bases vectors,
$$|UP> = \begin{pmatrix} 1\\\ 0 \end{pmatrix}$$
$$|DOWN> = \begin{pmatrix} 0\\\ 1 \end{pmatrix}$$
As we can see that we need to define 2 variables, up and down, to store the state. If the state is |UP> then up=0 and down=1.
Let's create a file named single_qubit_machine.py and define a class, QuanutumMachineSingle , it shall contain a constructor which initializes the value of up and down in the form of a state vector.
import numpy as np
import math

class QuantumMachineSingle(object):
    def __init__(self,up=True) -> None:

        self.state = np.array([0,0],dtype=np.csingle)
        # an array with 2 complex typed elements, one for UP and one for DOWN state!

        if up:
            self.state[0]=1.+0.j
        else:
            self.state[1]=1.+0.j
Let's added print function to our class will print the state vector of the machine.
    def print_state(self):
        print(self.state)
We will create a main.py file and put the following code to initialize to machine.
#main.py


from single_qubit_machine import QuantumMachineSingle


def main():
    machine = QuantumMachineSingle()

    print("\n State of the Quantum Machine:")
    machine.print_state()#printing the state of the machine!!

if(__name__ == "__main__"):
    main()
Run the code to see the machine in the |UP> state,
$python3 main_single.py

 State of the Quantum Machine:
[1.+0.j 0.+0.j]
Operators or Gates
An operator is an object which operates on the state vector to impart a rotation. Mathematically, we shall use matrices for this. Visually it looks like a matrix multiplication of a square matrix with the state vector to generate a new column vector which represents the final state after the operation.
$$|\psi_{n+1}>=M|\psi_{n}>$$
But first, create a method to be used by all the operators.
def apply_gate(self,matrix=np.array([[1,0],[0,1]])) -> None:

    	#whatever operator is provided is multiplied with the state to get a new state
        self.state = np.matmul(matrix,self.state)
Adding our first gate, Not Gate, or Pauli X gate which is mathematically is equal to,
$$X=\begin{pmatrix}0 \:\:\: 1\ \\1 \:\:\: 0\\ \end{pmatrix}$$
    #the X gate
	def X(self) -> None:
        operator = np.array([[0,1],[1,0]])
        self.apply_gate(operator)
Try it out by modifying the main function as,
#main.py

def main():
    machine = QuantumMachineSingle()
    print("\n State before applying NOT:")
    machine.print_state()#printing the state of the machine!!

    machine.X()


    print("\n State post NOT:")
    machine.print_state()#printing the state of the machine!!
Run and see that the state has indeed flipped now to |DOWN>
$ python3 main.py

 State before applying NOT:
[1.+0.j 0.+0.j]

 State post NOT:
[0.+0.j 1.+0.j]
We can easily create more gates now, all we need is a proper matrix representation of these gates. Let me skip to the part where I just show the code and you get the matrices out of it.
$$Y=\begin{pmatrix}0 \:\: -i\ \\i \:\:\:\:\: 0\\ \end{pmatrix}$$
$$Z=\begin{pmatrix}1 \:\:\:\:\: 0\ \\0 \:\: -1\\ \end{pmatrix}$$
    #the Y gate
    def Y(self) -> None:
        operator = np.array([[0,-1j],[1j,0]],dtype=np.csingle)
        self.apply_gate(operator)

    #the Z gate
    def Z(self) -> None:
        operator = np.array([[1,0],[0,-1]],dtype=np.csingle)
        self.apply_gate(operator)
Superposition
We have created a qubit and some operators to rotate the qubit on a bloch sphere. There is one operator which brings the qubit in a state of both |UP> and |DOWN> if the previous state is a pure state, and the operator is called the Hadamard Gate.
$$H=\frac{1}{\sqrt{2}} \begin{pmatrix}1 \:\:\:\:\: 1\ \\1 \:\: -1\\ \end{pmatrix}$$
In order to be able to create a superposition we will have to implement it.
#the Hadamard gate
def H(self) -> None:
        operator = 1/math.sqrt(2)*np.array([[1,1],[1,-1]],dtype=np.csingle)
        self.apply_gate(operator)
State Measurement
At the end, after all the operators have been applied, the state need not point in a pure state, |UP> or |DOWN>, so the result of measuring in our current bases will not yield a predictable outcome.
The probability of getting |UP> or |DOWN> will depend on the amplitudes in the state at the time of measurement. We would randomly give out one state based on its probability and to calculate it we use np.abs which gives the magnitude value of a complex number.
There is just a module for that: random. Import it in the starting of our single_qubit_machine.py file and add the following method to the machine class,
    def measurement(self):
        weights= np.abs(self.state)
        options = range(len(self.state))
        return random.choices(options,weights=weights,k=1)
Note: This measurement of ours is not modifying the state of the system. This is not true in general. A measurement by an operator actually leaves the state in an Eigenvector of the used gate, but we will leave it like this so that we could perform measurements again and again without having to run all those operations again. We shall see the real measurement later on in the article.
Let's play a little with the code we have just set up. We
- will take a qubit in
|UP>state. - We will apply
Hgate to create a superposition and then, - do the measurement.
Modifying the main.py once again,
def main():
    machine = QuantumMachineSingle()
    print("\n Initial State:")
    machine.print_state()#printing the state of the machine!!

    machine.H()

    print("\n\nStarting Measurements")
    print("1:"+str(machine.measurement()))
    print("2:"+str(machine.measurement()))
    print("3:"+str(machine.measurement()))
    print("4:"+str(machine.measurement()))


    print("\n Final State:")
    machine.print_state()#printing the state of the machine!!
Running the code above should output,
$python3 main.py

 Initial State:
[1.+0.j 0.+0.j]

Starting Measurements
1: [1]
2: [1]
3: [0]
4: [1]

 Final State:
[0.70710677+0.j 0.70710677+0.j]
Now, because we had applied the Hadamad gate to the qubit it was in a state of supersposition. Hence, despite the fact that the final state remained the same, the output of each measurement was probabilistic.
2 Qubits system
Some changes are required in machine class to accomodate state for 2 qubits. Such a state requires 4 elements as shown in the following result,
$$\begin{pmatrix} a \\\ b \end{pmatrix} \bigotimes \begin{pmatrix} c \\\ d \end{pmatrix}=\begin{pmatrix} ac \\\\ ad \\\\ bc \\\\ bd \\\\ \end{pmatrix}$$Let's edit our machine class as well,
def __init__(self,initial_state=0) -> None:

        # an array with 4 elements to represent a state of 2 spin particles
        self.state = np.array([0,0,0,0],dtype=np.csingle)

        self.state[initial_state]=1.0 + 0.0j;
Think for a minute now, since our state vector now contains 4 elements, we need gates as 4x4 matrices otherwise a matrix multiplication is not going to stay valid. We are going to use a trick to convert our familiar 2x2 operators into a 4x4 operators.
Let's look at an example, suppose we have 2 qubits, $q_{0}$ and $q_{1}$, and we apply a X gate to $q_{0}$ and a H gate to $q_{1}$. Now, we cannot perform a matrix multiplication as our state has 4 elements, but we can create a 4x4 operator using the tensor product of our 2x2 operators.
Let me show you how it is done for 2 general operators,
#### Tensor Product of Matrices! $$\begin{pmatrix} a & b\\\ c & d \end{pmatrix} \bigotimes \begin{pmatrix} w & x\\\ y & z \end{pmatrix}=\begin{pmatrix} a\begin{pmatrix} w & x\\\ y & z \end{pmatrix} & b\begin{pmatrix} w & x\\\ y & z \end{pmatrix}\\\ c\begin{pmatrix} w & x\\\ y & z \end{pmatrix} & d\begin{pmatrix} w & x\\\ y & z \end{pmatrix} \end{pmatrix}$$ $$=>\begin{pmatrix}aw & ax & bw & bx \\\ ay & az & by & bz \\\ cw & cx & dw & dx \\\ cy & cz & dy & dz \\\ \end{pmatrix}$$What if we only have an X operator to apply to $q_{0}$ and none for $q_{1}$. How will we then get a 4x4 matrix operator?
The answer to that is if you do not apply any operator, there is still one operator that can be supposed being applied, Identity I operator! So we take a tensor product with that.
Now this operator is of the proper shape to be applied and it is equivalent to applying X gate to just the first qubit. Here, the order matters. In general, $$A \bigotimes B \neq B \bigotimes A $$
Let's modify our apply_operator method to accommodate for the Kronecker Product with Identity Matrix for each operation.
    def apply_gate(self,matrix=np.array([[1,0],[0,1]]),position=0) -> None:
        identity =np.array([[1,0],[0,1]])
        f=None
        if position==0:
            f=np.kron(matrix,identity)
        else:
            f=np.kron(identity,matrix)
        self.state = np.matmul(f,self.state)
And the rest of the single qubit gates,
    def I(self,position=0) -> None:#the Identity gate
        operator = np.array([[1,0],[]],dtype=np.csingle)
        self.apply_gate(operator,position)

    def X(self,position=0) -> None:#the X gate
        operator = np.array([[0,1],[1,0]],dtype=np.csingle)
        self.apply_gate(operator,position)

    def Y(self,position=0) -> None:#the Y gate
        operator = np.array([[0,-1j],[1j,0]],dtype=np.csingle)
        self.apply_gate(operator,position)

    def Z(self,position=0) -> None:#the Z gate
        operator = np.array([[1,0],[0,-1]],dtype=np.csingle)
        self.apply_gate(operator,position)

    def H(self,position=0) -> None:#the Hadamard gate
        operator = 1/math.sqrt(2)*np.array([[1,1],[1,-1]],dtype=np.csingle)
        self.apply_gate(operator,position)

    def phase_gate(self, phase,position=0) -> None:#the General gate
        operator = np.array([[1,0],[0,math.e**(phase*1j)]],dtype=np.csingle)
        self.apply_gate(operator,position)


    def measurement(self):
        weights= np.abs(self.state)
        options = range(len(self.state))
        return random.choices(options,weights=weights,k=1)
2-Qubit Gates
Along with the single qubit gates, we are going to introduce 2 new gates which require a pair of qubits as an input, and results a pair as a result of the computation. These are CNOT and SWAP gates. There are many other available, but we will settle for these two for the moment.
CNOT is a control gate. It has a controller and a controllee(the qubit which is subjected to the control logic). The controllee is flipped(applied with a X) if the controller is 1. To use the CNOT gate, we specify 2 qubit indexes, one for controller and one for controllee. Again, the order matters.
The forward CNOT is applied when the controller is the top qubit, else reversed is used. Order of qubits matter here because the state vector is managed in that order.
SWAP gate is used to swap 2 qubits. Swapping A with B is equivalent to swapping B with A unlike in CNOT operator. This is a formal definition of the operator we are going to work with,
Let's add the method for the CNOT and SWAP gates in the machine class by writing our matrix multiplication.
    # 2 Qbits Gates
    def CNOT(self,control,target):
        if(control<target):
            self.state = np.matmul(np.array([[1,0,0,0],[0,1,0,0],[0,0,0,1],[0,0,1,0]]),self.state)
        else:
            self.state = np.matmul(np.array([[1,0,0,0],[0,0,0,1],[0,0,1,0],[0,1,0,0]]),self.state)

    def SWAP(self):
            self.state = np.matmul(np.array([[1,0,0,0],[0,0,1,0],[0,1,0,0],[0,0,0,1]]),self.state)
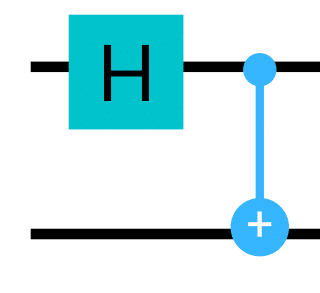
Equipped with these two quantum gates, let's create some entanglement now.
Entanglement
Roughly speaking, entanglement is a kind of a contract that both parties sign under which they have been put under a condition where they agree on the outcome of a measurement. I will show you how to create entanglement between pair of qubits. That operation can be repeated multiple times to get entanglement between multiple qubits but for now we are working in a 2-qubit setting.
Steps to create entanglement
- Create superposition of qubit $q_{0}$ using Hadamard gate.
- Use a version of Controlled gate,
CNOTin our case, on $q_{0}$ and $q_{1}$ to create a dependency of $q_{1}$ on qubit $q_{0}$.
This will put the $q_{1}$ qubit in a superposition and corelated with the qubit $q_{0}$
Modify the main method to create the above circuit,
def main():
    machine = QuantumMachineDouble()
    print("\n Initial State:")
    machine.print_state()#printing the state of the machine!!
    machine.H(0)
    machine.CNOT(0,1)


    print("\n Entangled state State:")
    machine.print_state()#printing the state of the machine!!

    print("\n Measurements")

    for i in range(20):
        print(str(i)+" index:"+str(machine.measurement()))
We are interested in the final state vector of the system. There will be very high probability amplitudes corresponding to the |UP,UP> and |DOWN,DOWN> states. Therefore, upon measurement, we always end up with these pairs and not with |UP,DOWN> or |DOWN,UP> states. Let's run the machine and see.
$ python3 main_double.py

 Initial State:
[1.+0.j   0.+0.j   0.+0.j   0.+0.j]

 Entangled state State:
[0.7 +0.j 0+0.j   0+0.j   0.7+0.j]

 Measurements
0 index:[0]
1 index:[3]
2 index:[0]
3 index:[3]
4 index:[0]
5 index:[3]
6 index:[0]
7 index:[0]
8 index:[0]
9 index:[3]
10 index:[3]
11 index:[0]
12 index:[3]
13 index:[3]
14 index:[0]
15 index:[0]
16 index:[0]
17 index:[0]
18 index:[0]
19 index:[3]
We never see the state in any of the indexes 1 or 2, because the system is entangled and will always result in either |0,0> or |1,1> upon measurement.
We have not talked about the real quantum mechanical measurement yet. I have intentionally refrained from using it till now because it could overwhelm newcomers but now it is the need of the time.
Measuring a single Qubit in the middle of circuit...
Measurement M in quantum mechanics is an operator over a single qubit $q_{n}$, which leaves the state of $q_{n}$ in a classical state.
Note: I will not go deep into the theory of the measurement much, so if you need to learn more about it, feel free to check the links at the end of the article.
The operator $M$ comes in two flavous, $M_{0}$ and $M_{1}$.
$$M_{0}=\begin{pmatrix}1 \:\:\: 0\ \\0 \:\:\: 0\\ \end{pmatrix}$$
$$M_{1}=\begin{pmatrix}0 \:\:\: 0\ \\0 \:\:\: 1\\ \end{pmatrix}$$
$M_{0}$ is the operator that leaves the qubit in the state 0 or |UP> after measurement and $M_{1}$ leaves it in 1 or |DOWN>. We can think of $M = M_{0} + M_{1}$.
Note: The operators $M_{0}$ and $M_{1}$ have a 0 determinant, meaning that they are not invertible, as you would expect. Measurements in quantum mechanics are irreversible.
Now, how does it all fit into the system we have built??? Let me explain in the following steps on how to apply measurement to a single qubit among 2 qubits.
- Calculate the 4x4 version operators of both $M_{0}$ and $M_{1}$ by applying tensor product with
Ioperator. - Calculate the expectation value of each $M_{0}$ and $M_{1}$ by using the relation: $Exp(M) = <\psi|M|\psi>$. These expectation values are compared in the next step.
- Select one of the two states of the qubit using our probabilistic collapse, using the expectation values as the probabilities.
- If the result of the previous step is found to be
|DOWN>then calculate the new finalstateof the system using $state=M_{1}|\psi>$ operator, else use $M_{0}$ operator. - Normalize the state vector as we have deleted(zeroed) some states and the probability sum should always result in 1.
The code for the above logic will be generalized for more than 2 qubits and presented in the next section along with the code for a general N-Qubit system.
Arbitrary N-Qubit System
This section is the easiest as it does not involve any new concepts from quantum mechanics, just some programming tricks to make our current 2-qubit system into a general N-qubit system.
To keep the article from exploding, I present to you the full N-qubit Quantum Machine source code now without much explaining. I expect now that the readers will be able to understand everything.
import numpy as np
import math
import random

class QuantumMachine(object):
    def __init__(self,initial_state=0,qubits=1) -> None:
        self.qubits= qubits
        self.state = np.array([0]*(2**qubits),dtype=np.csingle)

        self.state[initial_state]=1.0 + 0.0j;

    #helper function to print current state
    def print_state(self):
        print(self.state)

    def I(self,position=0) -> None:#the X gate
        operator = np.array([[1,0],[]],dtype=np.csingle)
        operator = self.construct_matrix_for_single_qubit_op(position,operator)
        self.apply_gate(operator)

    def X(self,position=0) -> None:#the X gate
        operator = np.array([[0,1],[1,0]],dtype=np.csingle)
        operator = self.construct_matrix_for_single_qubit_op(position,operator)
        self.apply_gate(operator)

    def Y(self,position=0) -> None:#the Y gate
        operator = np.array([[0,-1j],[1j,0]],dtype=np.csingle)
        operator = self.construct_matrix_for_single_qubit_op(position,operator)
        self.apply_gate(operator)

    def Z(self,position=0) -> None:#the Z gate
        operator = np.array([[1,0],[0,-1]],dtype=np.csingle)
        operator = self.construct_matrix_for_single_qubit_op(position,operator)
        self.apply_gate(operator)

    def H(self,position=0) -> None:#the Hadamard gate
        operator = 1/math.sqrt(2)*np.array([[1,1],[1,-1]],dtype=np.csingle)
        operator = self.construct_matrix_for_single_qubit_op(position,operator)
        self.apply_gate(operator)

    def phase_gate(self, phase,position=0) -> None:#the General gate
        operator = np.array([[1,0],[0,math.e**(phase*1j)]],dtype=np.csingle)
        operator = self.construct_matrix_for_single_qubit_op(position,operator)
        self.apply_gate(operator)

    def measure(self,qubit=0):
        # 0=up, 1=down
        m_0 = np.array([[1,0],[0,0]],dtype=np.csingle)
        m_1 = np.array([[0,0],[0,1]],dtype=np.csingle)

        # step 1
        m0_matrix = self.construct_matrix_for_single_qubit_op(qubit,m_0)
        m1_matrix = self.construct_matrix_for_single_qubit_op(qubit,m_1)
        statevector_clone_0 = np.copy(self.state)
        statevector_clone_1 = np.copy(self.state)

        # step 2
        vec_0 = np.matmul(m0_matrix,statevector_clone_0)
        vec_1 = np.matmul(m1_matrix,statevector_clone_1)

        #step 3: calculating probabilities
        prob_0 = (np.abs(vec_0)**2).sum()
        prob_1 = (np.abs(vec_1)**2).sum()


        weights=[prob_0,prob_1]
        options =[0,1]

        #result of the measurement for the qubit
        result=random.choices(options,weights=weights,k=1)
        #for this result calculate the next state vector
        if (result[0]==0):
            operator = m0_matrix
        else:
            operator = m1_matrix

        self.apply_gate(operator)
        self.normalize()
        return result[0]

    # 2-consequtive qubits Gates
    def CNOT(self,control,target):
        operator=None
        cnot_forward = np.array([[1,0,0,0],[0,1,0,0],[0,0,0,1],[0,0,1,0]])
        cnot_reverse = np.array([[1,0,0,0],[0,0,0,1],[0,0,1,0],[0,1,0,0]])

        if(abs(control-target)==1):
            if(control<target):
                operator=self.construct_matrix_for_double_qubit_op(control,cnot_forward)
            else:
                operator=self.construct_matrix_for_double_qubit_op(target,cnot_reverse)
        else:
            print("Can only be applied to consecutive bits")
            exit(1)
        self.apply_gate(operator)

    def SWAP(self,first,second):
        operator=None
        if(abs(first-second)==1):
            operator=self.construct_matrix_for_double_qubit_op(first,np.array([[1,0,0,0],[0,0,1,0],[0,1,0,0],[0,0,0,1]]))
        else:
            print("Can only be applied to consecutive bits")
            exit(1)
        self.apply_gate(operator)

    def apply_gate(self,matrix) -> None:
        self.state = np.matmul(matrix,self.state)

    def construct_matrix_for_single_qubit_op(self,position,matrix):
        #performing Kronecker product to evaluate a full system matrix
        # for this particular single qbit gate and then multiply with the state vector to transform it!
        final_matrix = None
        for i in range(0,self.qubits):
            if(i != position):
                if(final_matrix is None):
                    final_matrix = np.eye(2)
                else:
                    final_matrix = np.kron(final_matrix,np.eye(2))#tensor product of matrices
            else:
                if(final_matrix is None):
                    final_matrix = matrix
                else:
                    final_matrix = np.kron(final_matrix,matrix)#tensor product of matrices

        return final_matrix

    def construct_matrix_for_double_qubit_op(self,position,matrix):
        #performing Kronecker product to evaluate a full system matrix
        # for this particular single qbit gate and then multiply with the state vector to transform it!
        final_matrix = None
        for i in range(0,self.qubits):
            if( i!=position and i!=(position+1) ):
                if(final_matrix is None):
                    final_matrix = np.eye(2)
                else:
                    final_matrix = np.kron(final_matrix,np.eye(2))#tensor product of matrices
            elif(i!=(position+1)):
                if(final_matrix is None):
                    final_matrix = matrix
                else:
                    final_matrix = np.kron(final_matrix,matrix)#tensor product of matrices

        return final_matrix

    def construct_matrix_for_triple_qubit_op(self,position,matrix):
        #performing Kronecker product to evaluate a full system matrix
        # for this particular single qbit gate and then multiply with the state vector to transform it!
        final_matrix = None
        for i in range(0,self.qubits):
            if( i!=position and i!=(position+1) and i!=(position+2) ):
                if(final_matrix is None):
                    final_matrix = np.eye(2)
                else:
                    final_matrix = np.kron(final_matrix,np.eye(2))#tensor product of matrices
            elif(i!=(position+1) and i!=(position+2)):
                if(final_matrix is None):
                    final_matrix = matrix
                else:
                    final_matrix = np.kron(final_matrix,matrix)#tensor product of matrices

        return final_matrix


    def normalize(self):
        factor = np.sqrt((np.abs(self.state)**2).sum())
        self.state = self.state/factor
Note: We can useSWAPandCNOTfor immediate 2 qubits only. How can we applyCNOTon 1st and 3rd bit? UseSWAPbetween 2nd and 3rd qubit, applyCNOTto the 1st and 2nd qubit,SWAPback the 2nd qubit with 3rd qubit to put it back!
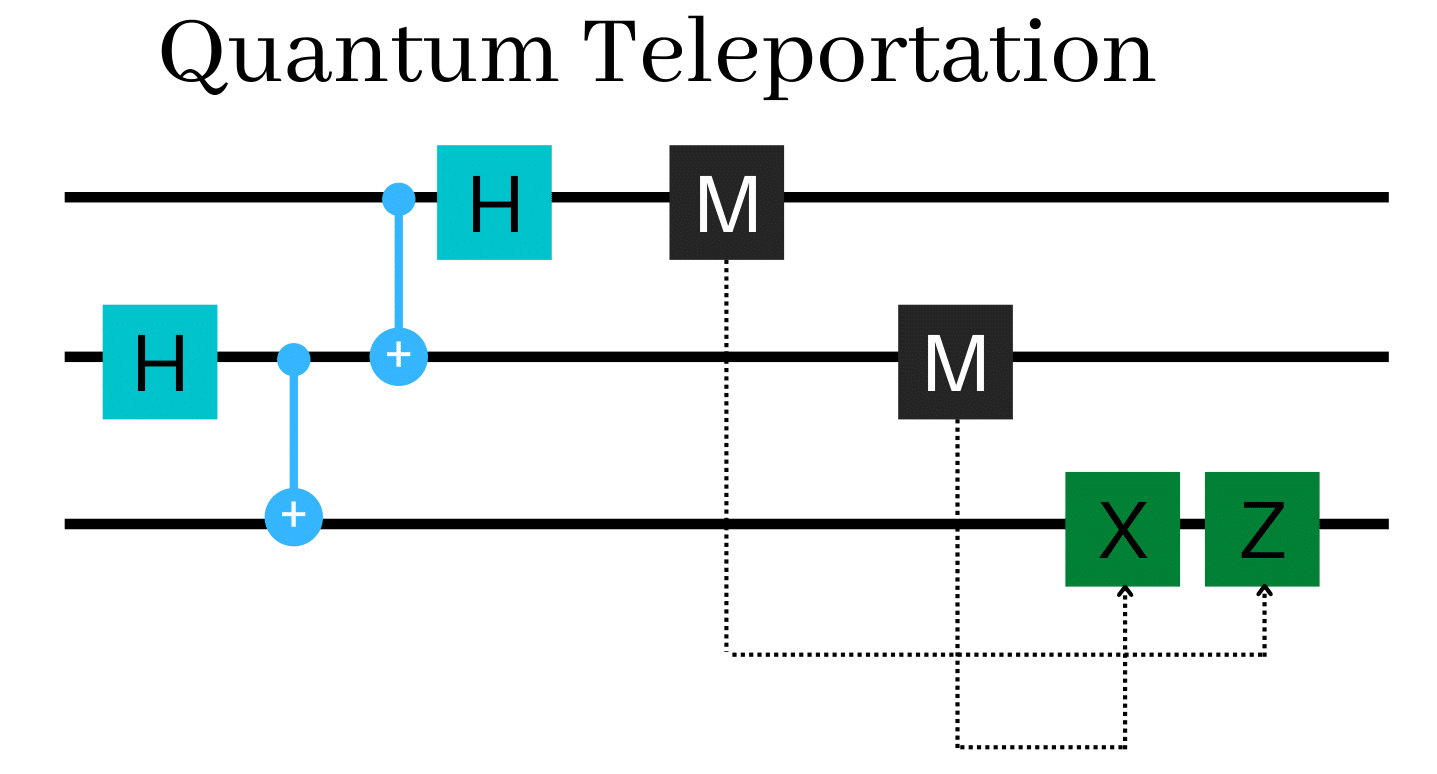
Implementing Quantum Teleportation
We will implement the algorithm which is help us teleport a single qubit. I have drawn the circuit diagram below,
Add the following function to teleport a package, which can be a 0 or 1 to the main.py file with the following code,
from machine import QuantumMachine

def do_teleport(package):
    if(package == 0):
        initial_state = 0
    else:
        initial_state = 4

    machine = QuantumMachine(qubits=3,initial_state=initial_state)

    machine.H(1)
    machine.CNOT(1,2)

    machine.CNOT(0,1)
    machine.H(0)

    crz=machine.measure(0)
    crx=machine.measure(1)

    if(crx==1):
        machine.X(2)

    if(crz==1):
        machine.Z(2)

    result = machine.measure(2)

    #return the teleported qubit!
    return result


def main():

    for i in range(10):
        print("package: ",i%2," & the teleported Qubit is: ",do_teleport(i%2))


if(__name__ == "__main__"):
    main()
Let's run the machine and see the results,
$python3 main.py
package:  0  & the teleported Qubit is:  0
package:  1  & the teleported Qubit is:  1
package:  0  & the teleported Qubit is:  0
package:  1  & the teleported Qubit is:  1
package:  0  & the teleported Qubit is:  0
package:  1  & the teleported Qubit is:  1
package:  0  & the teleported Qubit is:  0
package:  1  & the teleported Qubit is:  1
package:  0  & the teleported Qubit is:  0
package:  1  & the teleported Qubit is:  1
Our teleportation logic is working just fine!
An exercise for the readers
Implement 3-qubit Toffoli gate.
Finishing up
We have seen how to represent qubits in code & how to use them. How to simulate (however inefficiently) the operators/gates that are used to manipulate the state of the system. Perform measurements on various qubits which change the state vector of the system on a bloch sphere.
Full source code for this article is available on my github!
Resources
1.IBM Notes: https://arxiv.org/pdf/1804.03719.pdf.
2. Leonard Susskind: Quantum mechanics, the theoretical minimum lecture series and book.(https://theoreticalminimum.com/courses/quantum-mechanics/2012/winter)
3. A very nice blog on Measurement theory: https://towardsdatascience.com/understanding-basics-of-measurements-in-quantum-computation-4c885879eba0
4. Qiskit Quantum Computing Documentations: https://qiskit.org/documentation/qc_intro.html